Data Books
When I started in Highpower I was advised that, if I want to improve, I should get a data book. So I bought one and started to plot all my shots in it. After years of plotting groups and other bits of data I started to think about how this was helping me. The truth was, it wasn’t really helping me. At least not helping me very much.
In an effort to make my improvement more efficient I looked at making my data book more than just a bunch of plots of shots fired. Looking at the pages I found that there were spaces for data that I never filled in as well as no spaces for the data that I needed to write down. There was also a format that I wanted and couldn’t find in commercially available data books. So I decided to create my own that were tailor made to my needs.
In thinking about what I wanted from a data book I
came up with some concepts on how I wanted to use data books to help my
shooting.
-
The primary purpose of the data book is to establish and track the zeros for the rifle. Because of this I want a more detailed way to track the sight settings I have during each stage including sighters and record shots.
Data books with plot sheets are only for rapid fire. Slow fire has it’s own needs that would have to be met by a different format.
-
Each data book is for a specific stage of fire, e.g. 200 rapid fire. You shouldn’t have to flip through pages of slow prone to find what you had on the gun the last time you shot sitting.
Some data book plots, Creedmoor’s for example, have too many scoring rings. Since my groups don’t (usually) go all over the paper, I’m only interested in the target out to the 9-ring. If the shot goes out further than that it’s typically something so obvious that it doesn’t need plotting.
While all data book plots have a grid showing m.o.a. from center, I have trained myself to think only in clicks. Consequently, I wanted a plot sheet to reflect this.
How I use the rapid-fire data book
Since most Highpower shooters are familiar with plotting rapid fire groups in a book, I’ll start with this. I’ve scanned a page from my 200 rapid-fire data book from the 2006 season so you can see the information that I enter. Refer to it as you read below.
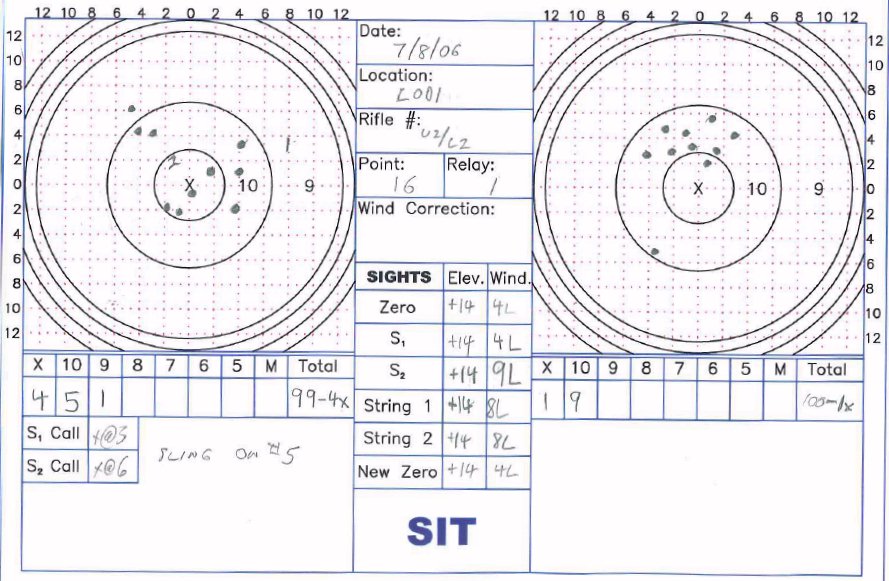
After arriving to the range and getting my squadding and score cards, I’ll enter the Date, Rifle number, and range information on the sheet. I want to fill in as much as I can before shooting so that when I’m on the firing line I can focus on the shooting-specific information.
A critical piece of this information is my no-wind zero. This can be found on the previous match's data sheet as the “New Zero”. I write this in because that is the starting point for my sights. I try to put these sight settings on the rifle as soon as I write this on the page. That way when my preparation period starts I’ll be ready to adjust this starting point. In the scanned example my Zero for this upper is 14 clicks from bottom and 4 clicks left of a paint mark I have on the windage knob.
Remember, all I care about is clicks. Minutes of angle mean nothing to me since my sights aren’t based on that unit of measure.
By the time the preparation period has ended I will have a pretty good idea what sight adjustments I want to have on the rifle, if any. If I feel that an adjustment is warranted (because of wind, light, etc.) I will put it on the rifle and write down the new sight settings in the book. These are the sight settings that I will use for my first sighting shot.
Right after I shoot the first sighter, while waiting for the target to be scored, I will note my call for this first shot. When the target comes up I compare my call to the true position of the shot. In the example, I noted that my call was on the right side of the x-ring while the shot was way out in the nine (the numeral “1”). Since I felt good with my call I made the full correction of five clicks left (from true shot location to shot call location). I then shot my second sighter and again noted my call which was again in the x-ring. The shot came up as an X at about 10 o’clock (the numeral “2”). While the call and shot location roughly matched, having 5 clicks on the rifle seemed a bit much for 200 yards so I took off one click for the first string.
Once the first string is fired I write the sight settings that I used to shoot it on the page. When the targets are exposed during the challenge period I’ll plot the location of the 10 shots and their values in the appropriate scoring boxes. While the score is nice to have, it’s the group location that I’m more concerned with at this point. If the group is not centered I will make an adjustment based on my judgment call. This will be my starting point for the second string.
After shooting the second string I will note the sight setting that I used as well as plot the group.
Now I will have to write down the most important piece of information on the whole sheet. Using my experience, an analysis of how I shot the strings, the conditions, sight settings of other shooters on my relay, and a host of other factors, I have to decide what my new no-wind zero is for that stage. A lot of times it will be the same zero that I started the stage with. But if I feel my zeros have shifted I will adjust my zero a click or two. Regardless of how I arrive at the values, when I walk off the firing line I want to have an elevation and windage setting that I’m confident will net me a clean when I align the sights and squeeze the trigger.
If you would like to use them, you can download my 200 yard and 300 yard datasheets. Just print them on A-size paper and cut them in half.
My slow-fire data book
In rapid fire you shoot an entire string of 10 shots before you can see where the impacts are going. For slow fire the feedback comes after each shot. Because of this I use a different data book/sheet for slow fire than I do for rapid fire. Even though the format is different, the goal of the data book is the same, to know my no-wind zero.
As I'm shooting slow fire I break each shot as best as I can. At the instant the shot goes down range I have a call in my head of where that shot should wind up. When the target comes back in the air I can gauge the difference between my call and the spotter location. If there is a discrepancy between the two, then I need to figure out a reason for it. It could be because of wind, light, sight alignment, mis-adjusted sights, or any number of other reasons. Based on what the reason is I might adjust my sights. Once I'm satisfied that I know the cause of the impact-call discrepancy, I will continue with the next shot and repeat this process.
When I'm trying to get zeros for a new rifle I will spend more time adjusting the sights than I normally would. I'll repeat the sequence of shoot-call-adjust until the shot impact matches my call. Sometimes this process will take just a few shots at first or it may take more. A lot of it depends on how I'm shooting that day. Once this initial zeroing period takes place I may find that some fine tuning of zeros needs to be done at the next match I shoot in. After a few matches though, I'll have a zero that I'm pretty confident in.
Getting back to the shooting and adjusting process... Eventually I'll be done with that stage of fire and my sights will probably deviate from what I consider my "painted zero" (so named because it's a zero that's based on the paint marks on the knobs). I will take into consideration the effects of environmental conditions and decide what the true no-wind zero should be for that stage of fire. This zero (elevation & windage) will then go into the next line of my slow fire data sheet. An example of a blank sheet for 200 yard slow fire is shown below:
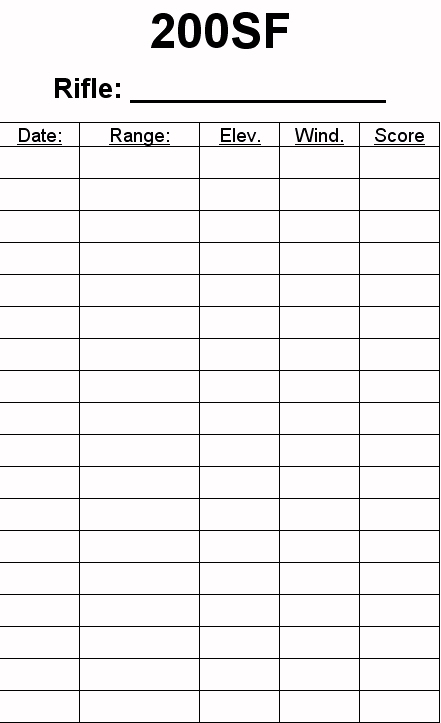
The most important information on the sheet is the number of clicks from the bottom that my elevation needs to travel and the number of clicks, left or right, of windage from my paint mark. The next time I shoot this stage I can step up to the line, look at what the numbers were from the last time I shot and put that on the rifle. Then, when I finish shooting on that day, I can put another set of windage and elevation numbers on the next line. For most of the season, the numbers should read the same. But if there are any drifts I can easily see them on the sheet.